127.0.0.1:18789.If you tried to install OpenClaw on Windows and hit a wall, you are not alone. Most people do, because the fastest-looking path (PowerShell) has three Windows-only failures the docs never spell out, and the recommended path (WSL2) sounds scary if you have never opened a terminal before.
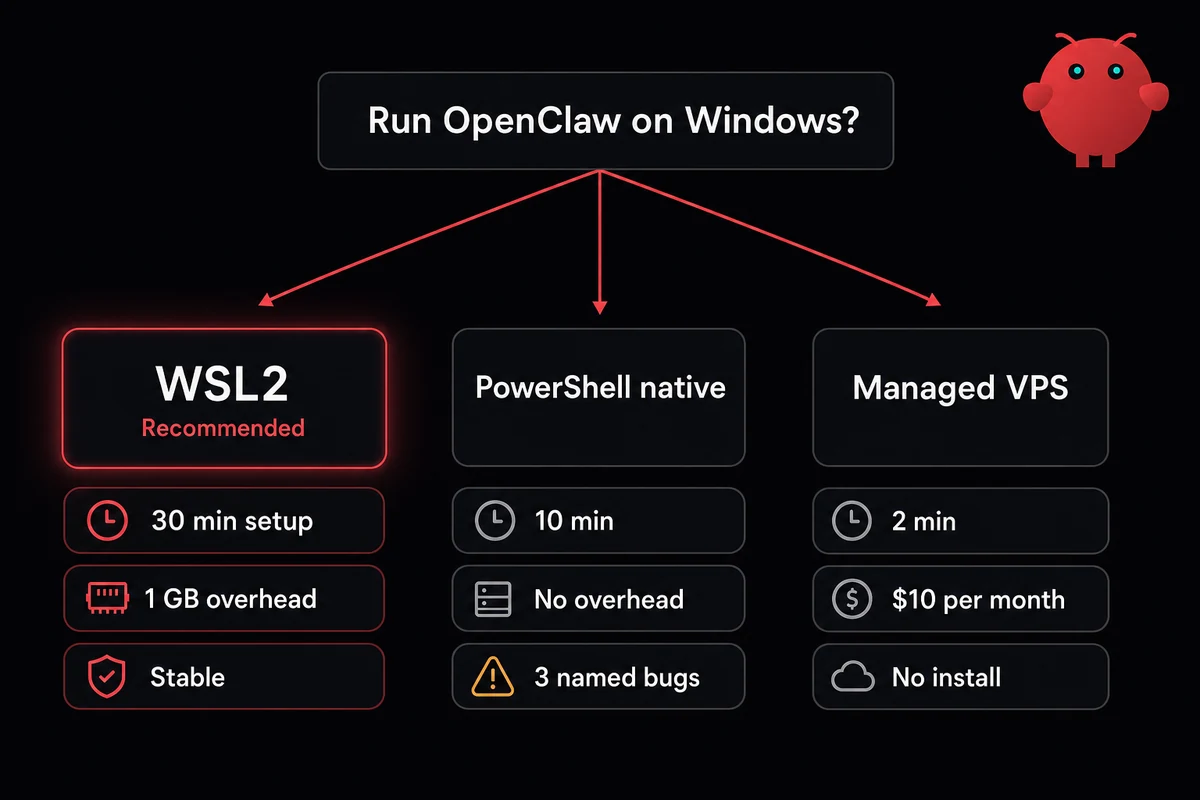
The numbers, before you pick: WSL2 takes about 30 minutes and rarely breaks. Native PowerShell takes about 10 if nothing goes wrong, and 40-plus when one of the three errors hits. A managed box is about 2 minutes from sign-up to a working install.
You will need Windows build 19041 or higher (the May 2020 update or later), Node 22.14 or newer, and at least 4 GB of memory on either DIY path. 8 GB if you want headroom. 16 GB if you ever want to run a local AI model on your own machine instead of paying a cloud service.
I tried PowerShell first because it looked faster. Forty minutes later I was reading three forum threads trying to figure out why my computer kept saying it could not find OpenClaw. I reinstalled the JavaScript runtime twice. I edited Windows settings I did not understand. Then I switched to WSL2, pasted one command, and was done in ten minutes.
You will need a few things before you start, and they are the same on every path:
- Node 22.14 or newer (Node 24 is what the docs prefer). Node is a free background program that runs JavaScript code on your computer. OpenClaw is built on it. Install it from nodejs.org by downloading the file and double-clicking it.
- At least 4 GB of RAM, or 16 GB if you ever want to run an AI model on your own machine instead of paying a cloud service.
- Windows 10 build 19041 or higher, which is the May 2020 update. Type
winverinto the Start menu to check yours. - About 10 GB of free disk space if local AI models are in your future. 1 GB is enough if you stick to cloud services.
Where OpenClaw keeps its memory and config files is worth a look before you start, especially if you care about backups.
Three ways to run OpenClaw on Windows
Before you start typing anything, pick a path. The wrong choice costs you 40 minutes; the right one is done in 10 to 30. Three options actually work: WSL2 (the recommended way, around 30 minutes), native PowerShell (faster but trips on three Windows-only errors), and a managed VPS (skip the install, around 47 seconds).
WSL2 is the recommended path. WSL2 stands for Windows Subsystem for Linux, version 2. It is a free thing Microsoft built into Windows that runs a tiny Linux machine alongside your normal desktop, in the background.
You install it once with one command. After that, you have a small Linux window you can open whenever you want. OpenClaw runs inside that Linux window and behaves the way the docs say it should. Setup is about 30 minutes, with about 1 GB of memory used in the background.
Native PowerShell is the do-it-yourself path that breaks more. PowerShell is the dark-blue Windows terminal app you can open from the Start menu. The install is faster on paper, about 10 minutes, but it trips on three Windows-only errors that the install page never warns you about. You will see them in the next section.
A managed VPS is the third option. A VPS is a computer somebody else owns that you rent by the month. Someone else runs OpenClaw on a fresh box, and you connect to it through a web page in your browser. About two minutes from sign-up to a working OpenClaw, versus 15 to 45 minutes doing it yourself.
| Method | Setup time | Stability | Memory used | Best for |
|---|---|---|---|---|
| WSL2 + Ubuntu | ~30 min | Stable | ~1 GB in the background | Anyone keeping it past the weekend |
| Native PowerShell | ~10 min if nothing breaks | Three named bugs | None over baseline | A 10-minute test, nothing more |
| Managed VPS | ~2 min | Hosted by someone else | None on your PC | If your time costs more than $10 a month |
Table: OpenClaw on Windows install paths compared
You may also see guides that recommend Docker Desktop, a fourth path. Skip it. Docker Desktop on Windows already runs WSL2 underneath the hood, so installing OpenClaw through Docker stacks one virtual machine on top of another for no real benefit. If that complexity sounds appealing, what you really want is a managed VPS, where someone else handles all of it.
What you need before you start
Five quick checks before you commit to a path: Windows version, Node.js, RAM, disk, and an AI service to call. Skip them and you find out your machine cannot run OpenClaw after you have already started, which is the worst time to find out.
Windows version. Type winver into the Start menu. The window that pops up should say build 19041 or higher (the May 2020 update). If yours is older, run Windows Update first.
Node.js installed. Node.js is the runtime OpenClaw needs to do anything. Go to nodejs.org, download the installer (the .msi file you double-click to install), and run it. The default options are fine. If you already have Node from somewhere else, that is fine; the OpenClaw installer will find it.
Enough memory. For cloud AI services like Claude, ChatGPT, or Gemini, 8 GB of RAM is fine. For running an AI model on your own machine, 16 GB is the floor, because the model files alone are huge (a single small model can be 25 GB on disk and needs a graphics card with at least 4 GB of memory).
Free disk space. 1 GB for OpenClaw itself, plus another 10 GB or so if you plan to run a local model.
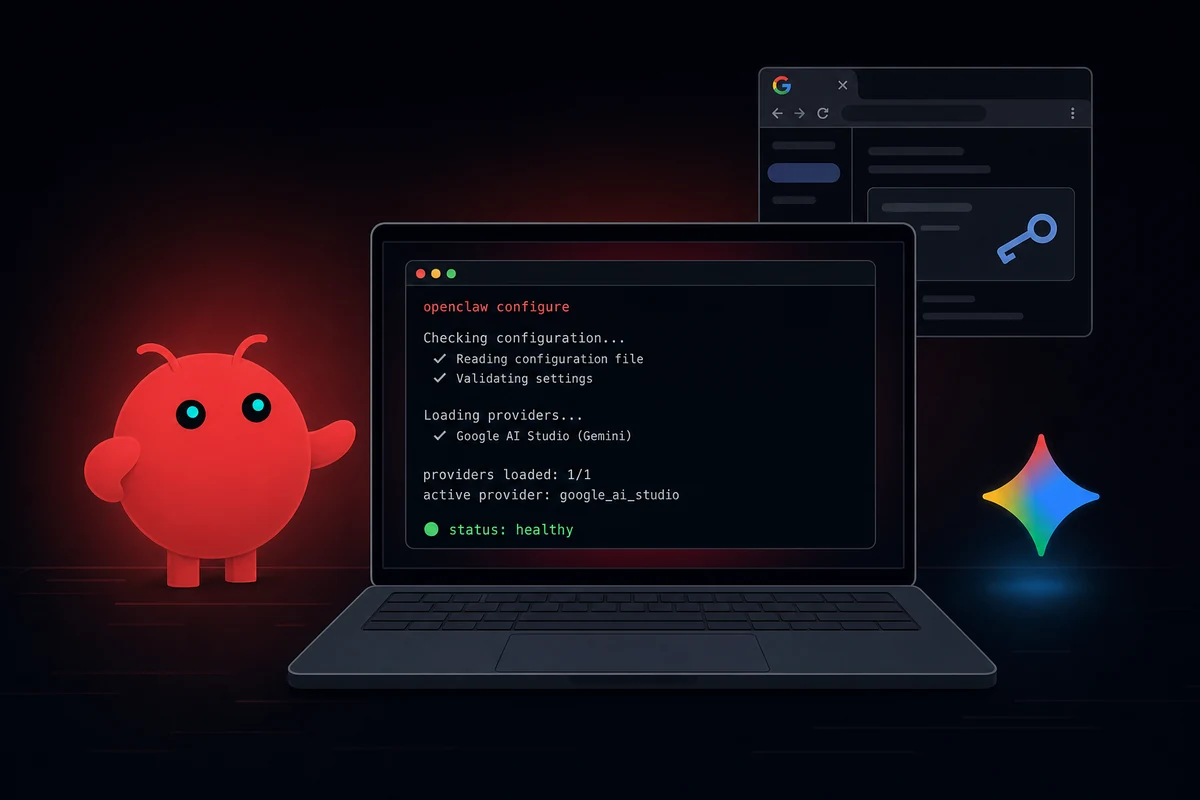
A way to talk to the AI. Either an API key (a password the AI service gives you that lets OpenClaw send messages on your behalf) from OpenAI, Anthropic, or Google, or you can sign in with Google when OpenClaw asks.
Google has a free tier (about 20 requests a day on Gemini 2.5 Flash) that is the cheapest way to try OpenClaw without paying a cent.
One thing I got wrong on my first install: tell Windows Defender, the built-in antivirus, to ignore the folder where OpenClaw installs its plugins. The folder is %AppData%\npm. Defender flags fresh plugin installs as suspicious and the install fails silently with no useful error.
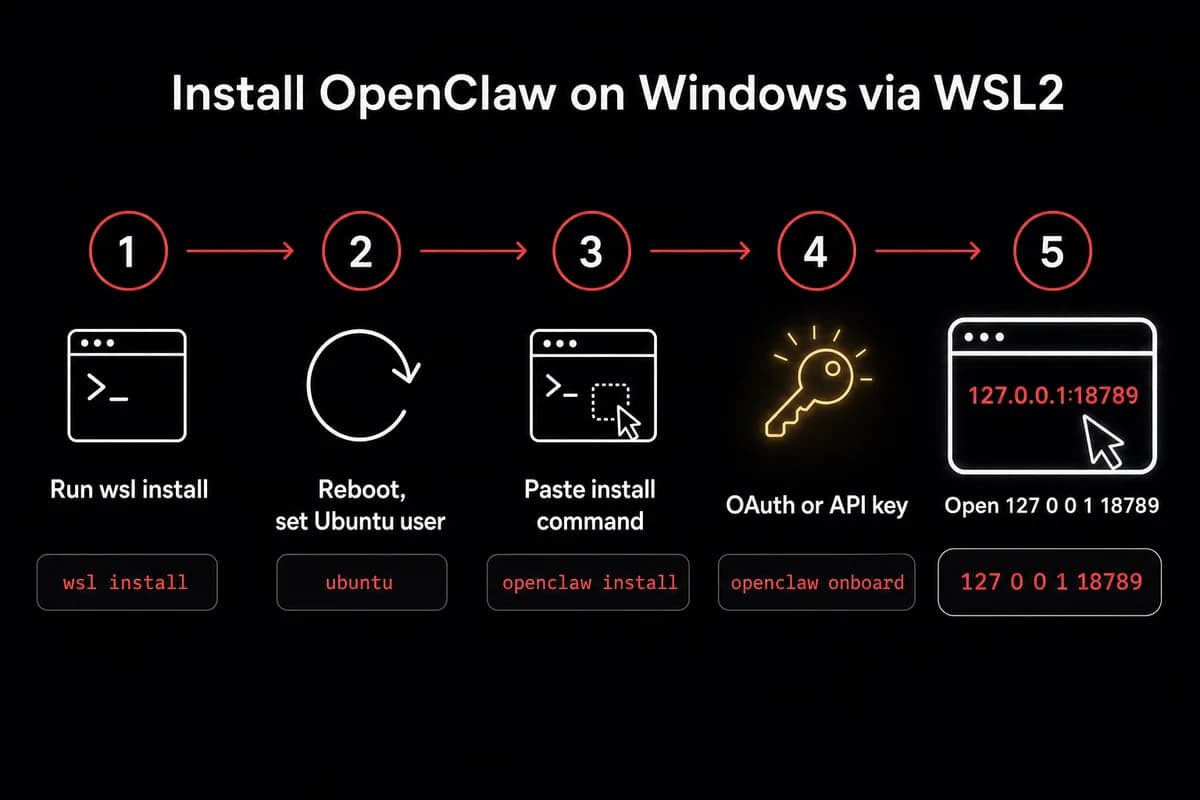
WSL2, end to end
WSL2 is the path most people end up on, and the one I run now. The whole point of WSL2 is to give OpenClaw its own little Linux world to live in, separate from your Windows files.
That separation is good for safety (more on that in a second) and good for stability (the install actually works the way the docs say). Five steps:
- Open PowerShell, the dark-blue Windows terminal app, in administrator mode. Right-click the Start button, then pick "Terminal (Admin)". Administrator just means an elevated mode Windows asks you about with a UAC prompt, the pop-up that says "Do you want to allow this app to make changes". Click yes.
- In the PowerShell window, type
wsl --installand press Enter. Windows downloads WSL2 and a free version of Linux called Ubuntu, all in one go. After a few minutes, restart your computer when it asks. - Once the computer comes back, an Ubuntu window opens by itself and asks you to pick a username and a password. Pick something you will remember. That password is what Linux asks for any time you need administrator rights inside Ubuntu.
- Now, in the Ubuntu window, copy the install command from openclaw.ai/install and paste it into the WSL2 terminal. You paste into a terminal by right-clicking inside it (Ctrl+V does not always work). The command tells your computer to download the OpenClaw installer and run it. A minute or two later, OpenClaw is installed.
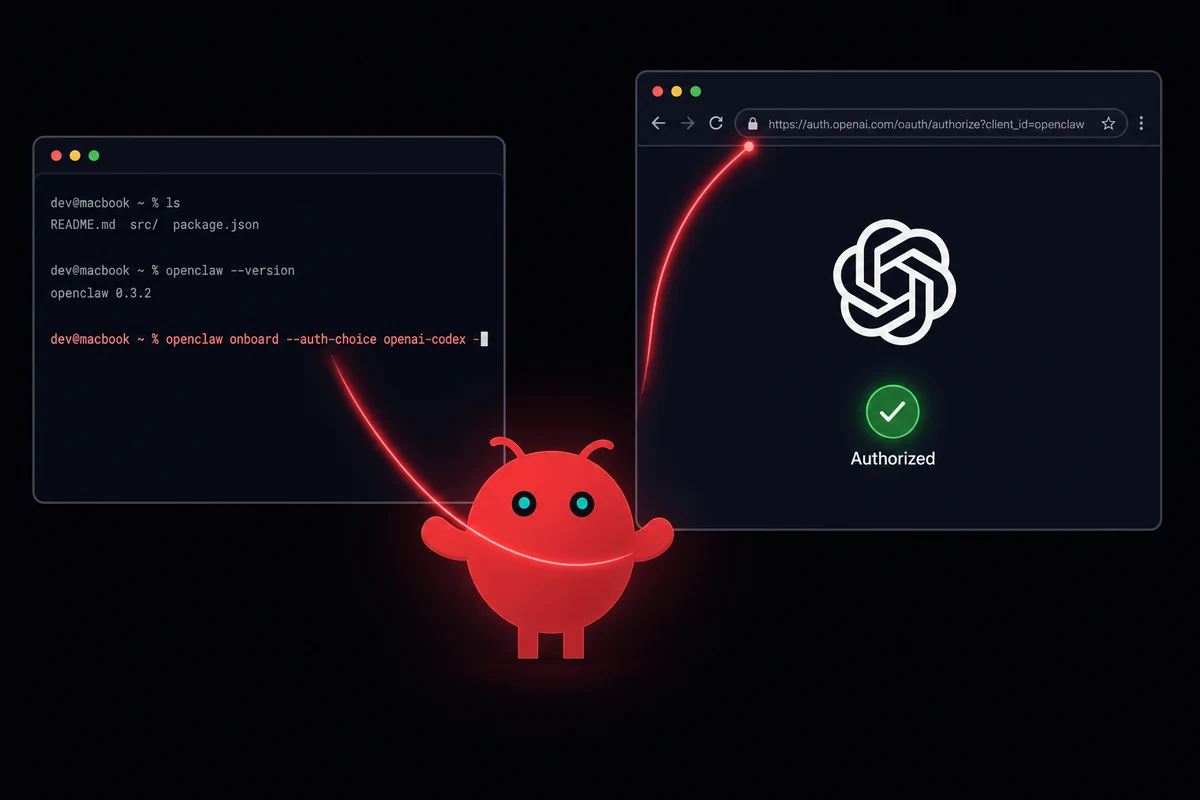
- Sign in. OpenClaw asks whether you want to use OpenAI, Google, or paste an API key. The Google option ("sign in with Google") is the friendliest, because a one-time link opens in your normal Windows browser, you click "approve", and the terminal finishes by itself.
When the terminal says you are done, open 127.0.0.1:18789 in your normal Windows browser. That is OpenClaw's gateway URL, the web page where you talk to OpenClaw on your own computer.
The number 127.0.0.1 is just shorthand for "this PC right here". The number after the colon (18789) is a fixed local web address WSL2 forwards from the Linux side to Windows for you. Bookmark the page.
Why WSL2 over running on Windows directly
OpenClaw is an AI agent that reads files on your computer. On a fresh Windows install, the easiest folder for a confused agent to wander into is your home folder, where things like saved passwords and cloud credentials live.
On WSL2, OpenClaw lives inside a separate Linux home with nothing of yours in it. If a plugin turns out to be sketchy, the worst it can do is mess up the Linux side, not your real Windows files. If you want the longer version, an OpenClaw security checklist covers it in detail.
Advanced readers can lock things down further by editing a file inside Ubuntu called wsl.conf to cut WSL2 off from Windows entirely. That is outside this guide.
When WSL2 sleeps, OpenClaw stops
OpenClaw is alive only while WSL2 is running. Close the Ubuntu window, run wsl --shutdown, or let your laptop sleep, and OpenClaw stops with it. Feature, not bug. If you want OpenClaw answering messages while your laptop is closed, you need to put it on a machine that does not sleep. We will get to that in the last section.
Native PowerShell, and where it breaks
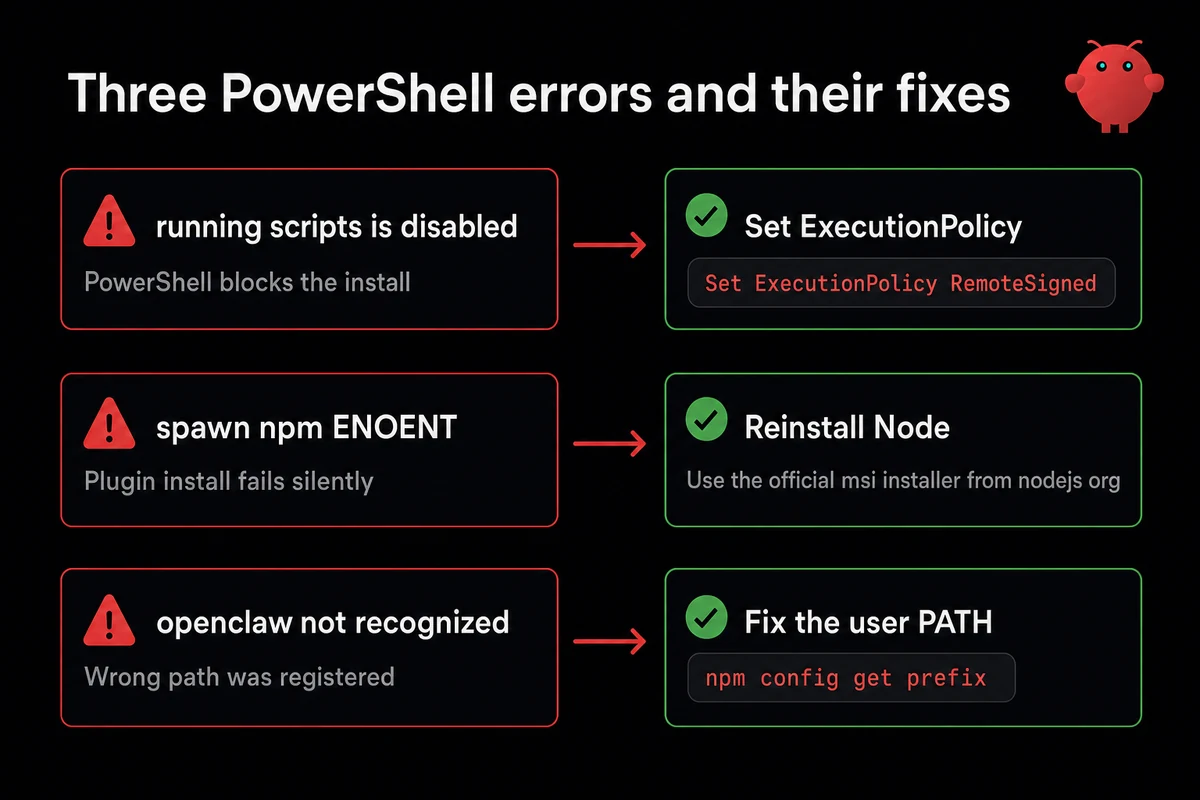
I hit error number one within five seconds of pasting the install command into PowerShell. PowerShell refused to run it. That was the cleanest of the three errors, because at least the message told me what was wrong.
The PowerShell install is one command that downloads the OpenClaw installer and starts the gateway. About ten minutes if nothing breaks. Here is the procedure with the fixes folded in:
-
Open PowerShell as administrator (right-click Start, pick "Terminal (Admin)", click yes on the UAC pop-up).
-
Type
Set-ExecutionPolicy RemoteSigned -Scope CurrentUserand press Enter. Windows blocks scripts from running by default, as a safety thing. This command unblocks them, but only for your user account, not the whole computer. When it asks, typeYand press Enter. -
Copy this command into PowerShell:
iwr -useb https://openclaw.ai/install.ps1 | iex 2>&1 | Tee-Object -FilePath install.logThis command tells PowerShell to download and run the OpenClaw installer, while writing a copy of everything it says to a file called
install.log. You will want that log, because PowerShell sometimes closes its window the moment the installer finishes and you lose the output. -
After install, type
openclaw --versionand press Enter to confirm it worked. Then open127.0.0.1:18789in your browser.
If step 4 fails with one of these messages, you have hit one of the two other named errors. Each has a one-step fix.
The error: Install failed (unknown exit): spawn npm ENOENT.
You see this red message the first time the agent tries to install a plugin. The fix: uninstall any version of Node you have, then download and run the installer from nodejs.org. The official installer puts a file called npm.cmd in the place OpenClaw expects, and that file is what was missing.
The error: 'openclaw' is not recognized as the name of a cmdlet.
You see this every time you type openclaw. It is the most common Windows install bug.
The fix: in PowerShell, type npm config get prefix and press Enter. Copy the folder it shows. Open the Start menu, type "environment variables", click "Edit environment variables for your account". Find the row called Path, click "Edit".
Delete the wrong line if you see one ending in \bin, then add the folder you just copied. Open a fresh PowerShell window and try openclaw --version again.
Quick reference: error to fix
| What you see | What to do |
|---|---|
running scripts is disabled on this system | Run Set-ExecutionPolicy RemoteSigned -Scope CurrentUser once |
Install failed (unknown exit): spawn npm ENOENT | Reinstall Node from nodejs.org |
'openclaw' is not recognized as the name of a cmdlet | Run npm config get prefix, fix Path entry by hand |
| PowerShell window closes before you can read output | Pipe the install to a log file (see step 3 above) |
Table: Windows-specific OpenClaw install errors and their fixes
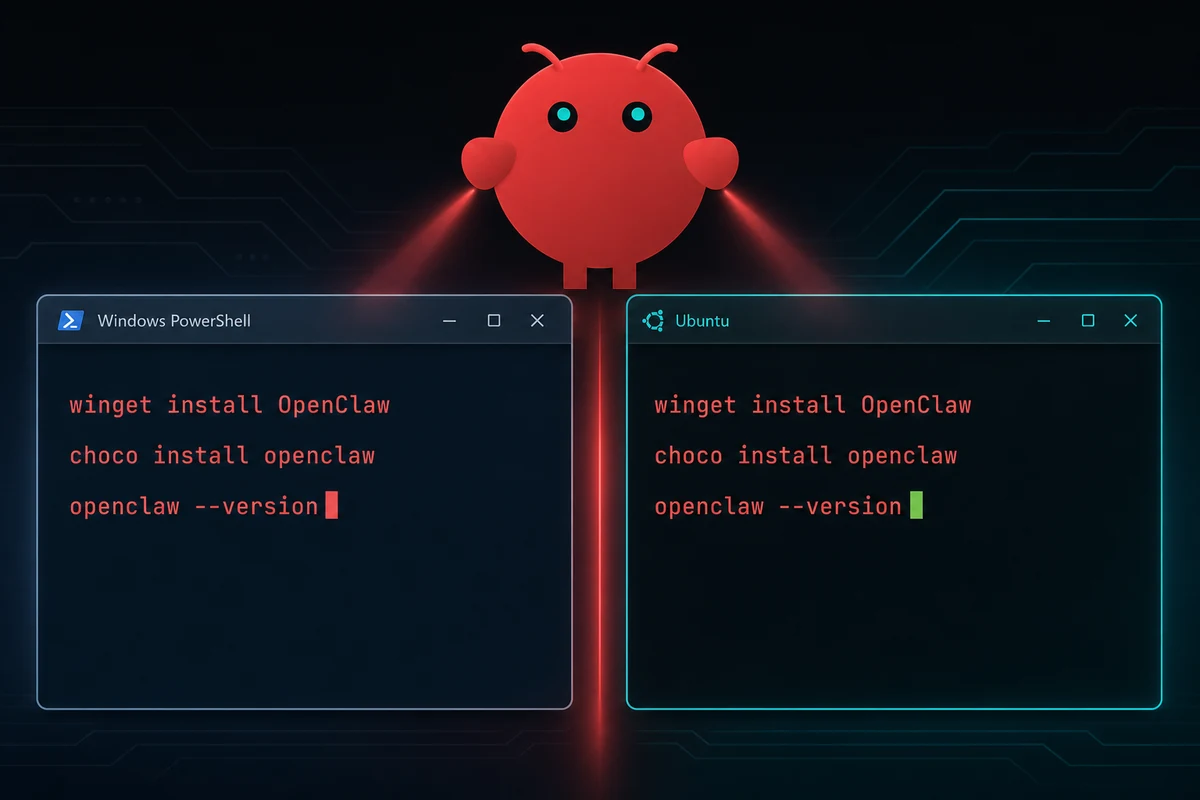
Three named errors and a wrong setting out of the box gets old fast. OpenclawVPS hands you a ready-to-go OpenClaw box in 47 seconds. No PowerShell. No Node version juggling. Plans start at $19 a month.
Connect a chat channel
Connecting a chat channel is what makes OpenClaw stop being a local toy and start being something useful. Telegram is the friendliest one to start with. WhatsApp is fragile. Slack is fine inside WSL2. Pick one. Trying to wire up three at once just multiplies the things that can go wrong.
For Telegram: open Telegram on your phone, search for @BotFather, send the message /newbot, follow what it asks you, and copy the long code (the bot token) it gives you back. Paste that code into OpenClaw under Channels, then Telegram.
Then, in your terminal, run openclaw pairing approved telegram followed by the pairing code OpenClaw shows. That command tells OpenClaw your Telegram account is allowed to talk to the bot. Send a message to the bot. If it answers, you are done.
WhatsApp is harder. OpenClaw uses an unofficial WhatsApp bridge (a piece of software that pretends to be WhatsApp Web) that asks you to scan a QR code from your WhatsApp Web session.
These unofficial bridges still occasionally get banned by WhatsApp in 2026, even when you are using them politely. The safe move is to use a separate prepaid SIM, not your real phone number; there is a longer treatment in WhatsApp pairing on a prepaid SIM worth reading first.
Slack is the boring one, and that is a compliment. Go to api.slack.com/apps, create a Slack app, walk through the sign-in flow Slack guides you through (this is OAuth, which is a fancy way of saying "sign in with another service"), copy the bot token Slack hands back, and paste it into OpenClaw under Channels then Slack. Restart the gateway.
The agent's personality lives in a file inside OpenClaw called soul.md. Open it in any text editor. The default is bland and corporate. Delete that and write what you actually want the bot to sound like.
Add a local AI model (optional, for if you have a gaming PC)
If you have a gaming PC with a recent NVIDIA graphics card, you can save money by running the AI model on your own hardware instead of paying a cloud service per message. Most readers can skip this section.
For everyone else: this is where the savings live, because cloud AI services like Claude or ChatGPT charge per message, and a chatty agent can easily run up $20 in a single day. A model on your own machine costs nothing once it is downloaded.
The trade-off is that a local model is not as smart as the big cloud ones for hard reasoning tasks. For everyday work, it is fine. If you want the cost math written out, my OpenClaw vs ChatGPT comparison goes into it.
The friendliest way to run a local model on Windows is a free app called Ollama. Download it from ollama.com (the installer is about 1.2 GB) and run it. After that, in PowerShell, type ollama pull followed by a model name.
The smaller the model, the less graphics-card memory it needs. Most NVIDIA cards from the last few years work; you will want at least 4 GB of memory on the card. To check what your card has, open Task Manager (press Ctrl+Shift+Esc), click "Performance", click "GPU 0", and look for "Dedicated GPU memory".
If you want a quick lookup of which model size fits which card:
| Graphics card memory | Model size that fits | Use case |
|---|---|---|
| 4 to 8 GB | Small (around 4 billion parameters) | Light Q&A, short replies |
| 12 to 16 GB | Medium (9 to 20 billion parameters) | General use, the sweet spot |
| 24 to 48 GB | Large (around 27 billion parameters) | Complex tasks, long replies |
| 96 GB or more | Very large (100+ billion parameters) | Frontier-class work |
Table: Graphics card memory to local model size, on Windows
If you are running OpenClaw inside WSL2 and Ollama on regular Windows, there is one gotcha: OpenClaw cannot reach Ollama through localhost (which is shorthand for "this PC"), because from inside WSL2, localhost means the little Linux machine, not your real Windows.
The easiest fix is to install Ollama inside WSL2 as well. The other way is to point OpenClaw at your Windows IP address; you can find it from inside Ubuntu by running cat /etc/resolv.conf | grep nameserver.
To see how a small local model stacks up against a big cloud one, my MiniMax 2.7 benchmarks is the most recent test I have published.
One more thing: you can only run one OpenClaw gateway at a time. If one is already running and you start another, the second one fails silently. Check before you blame the install.
When self-hosting on Windows isn't worth it
I run OpenClaw on a managed box now. It took me about three weeks of fighting my Windows laptop to admit the obvious: WSL2 stops when the laptop sleeps, the laptop sleeps when I close the lid, and a bot meant to answer messages at 3am needs a machine that never closes.
WSL2 stops when the laptop sleeps. The laptop sleeps when I close the lid. A bot that I want to run as my email assistant 24/7 goes silent the moment I shut my laptop. The fix is putting OpenClaw somewhere that never sleeps, even if that "somewhere" is a spare phone running Termux on a charger by your router.
Self-host on Windows when one of these is true: you have a desktop PC that stays on all the time, you really want the data isolation, you want to run local models on your own graphics card, or you genuinely enjoy the install dance.
If none of those apply, the alternatives:
- A dedicated little computer at home, like a Mac Mini M4 (10-core CPU, 10-core GPU, 16 GB RAM) for around $600. Quiet, always on, lives on your desk.
- A barebones rented server (a "droplet" from DigitalOcean or Hetzner) for around $5 a month. Cheap, but you have to install OpenClaw on it yourself.
- A managed Windows-free box where someone else handles the OpenClaw install for you, for a few dollars a month. That is what I do now, and honestly what most people probably should do.
OpenClaw is alive only while your WSL2 is running. That single sentence is the whole argument for moving OpenClaw off your daily-driver Windows machine once you are past the curious-tinkering phase.
The setup I run now
OpenclawVPS is what I moved to after the laptop-sleeps-and-the-bot-dies problem ate one too many weekends. Sign-up to a working OpenClaw gateway URL takes about 47 seconds. No Node versions to juggle. No PowerShell setting to flip. No missing-helper error to debug. You log into a web page and OpenClaw is already running.
Plans start at $19 a month for the Starter tier. There is a 3-day money-back guarantee, plus a free demo at /demo if you want to test before paying.